
|
| |
|
| |
 Homebuilt Aircraft Interiors, Part 4 - Carpet, Paneling, UpholsteringSport Aviation - 04/85By Tony Bingelis A GOOD PLACE to start your cockpit interior treatment work would be at the firewall. All openings in the firewall, openings for engine controls, wiring and any other gaps through which flames could penetrate must be sealed to prevent the spread of an engine compartment fire into the cockpit. Seal the openings using firewall grommets or a fire resistant sealant such as Pro-Seal 700. This must be done before you overlay the firewall with an insulation blanket or an upholstery material. So much for the firewall. Now, when you get to the cockpit, a fire originating there is most likely to be of an electrical origin. This type of fire usually results from overheated wires which cause the insulation to smolder or burn and fill the cockpit with smoke. If the smoldering wires happen to be in contact with materials which are flammable, you can have a major catastrophe in the making. Consider for a moment the total consequences of a cabin fire. The FAA has been studying the problem extensively and has concluded that, in addition to the fire, the toxic gases can be almost as dangerous. These gases are emitted during the combustion of cabin materials, side panels, carpets, fabrics and insulation, and are in the form of hydrogen cyanide and carbon monoxide . . . two of the most dangerous gases. The FAA has also determined that modacrylic drapes yielded the highest amount of hydrogen cyanide while wool and wool-nylon blends were almost as bad. Cotton-rayon fabrics seemed to produce the highest yield of carbon monoxide. Vinyl trim and headliners, as well as some of the other common plastics, also produced carbon monoxide gas and hydrochloric acid as well. Well, what all this seems to imply is that, if cockpit flames don't get you, the toxic gases will. However, all is not doom and gloom. Be sure your firewall is completely sealed, and try to use flame resistant or fireproof materials wherever you can. There is another thing you can do. Treat, or have your fabric treated, with a fire retardant chemical. If you are interested in this approach I am sure you can find commercially available chemicals that can help make your interior fabric more flame resistant (Flamex, Fire Safe AD-108, etc.). Whatever you use, follow the instruction to the letter. Another possibility, check with your local fire department and discuss your problem with them. NOTE: As usual, after you are sold on how good an idea or process is, you learn that it has some drawbacks. In the case of fire resistant treatments, you may find that some, if not all, of the products used to treat the fabric may accelerate fabric deterioration (sun rot), especially in those fabrics normally susceptible to that tendency. You may also find that some of these treatments could have a corrosive effect on any aluminum that happens to be in contact with the freshly treated fabric. CarpetingCarpeting can help reduce cockpit noise even if no other sound proofing is attempted. Select a short nap carpet and run it the full length of the cockpit up to and including the baggage compartment floor. Avoid using those shaggy long hair rugs. They are difficult to keep clean and look messy. Pure nylon carpeting is the easiest to keep clean and it is very durable. I guess you know this means you shouldn't be tempted to use heavy carpeting even if you have a lot left over from redoing your house. Before you cut any of that expensive material, it would be wise to make an accurate paper pattern of your cabin floor. Carefully cut out all the slots and openings needed to fit around the rudder pedals, seat tracks, control columns and seat belt attach points, as may be applicable to your aircraft. Next, and this is important, label the TOP side and the BOTTOM side of your pattern. Since you will trace it onto the backside of the carpet material, be sure you have the BOTTOM side of your pattern facing you. (Is that right? Check again.) Wherever possible, extend the carpeting up the sides of the cabin a couple of inches or so to serve as kick panels. The turned up edges of the carpeting also prevent dirt and fallen objects from disappearing and getting entrapped under the rug. Besides that, it will be much easier to clean up in the cockpit. After you cut and trim the rug to fit, take it to an upholstery shop and have all the slots, cut-outs and edges stitch bound. If seat tracks are installed, bind the slots in the carpeting for the tracks, too. The carpet will lay better and it will prevent the edges from unraveling. Before you put the carpeting down, lay down. a 1/4" layer of polyfoam as a padding. With or without the foam pad, the carpeting may tend to slide and slip around if it is not secured with dabs of adhesive, Velcro strips, small screw fasteners or carpet tape (sticky on both sides). Install scuff plates at the rudder pedals and these will also help to anchor the carpet, as well as protect it from localized wear. One more suggestion. Lay the carpeting over any wires or hydraulic lines that happen to run along the floor through the cockpit area. Not only will the carpeting hide these eyesores, it will help protect them from damage. Side PanelsThe way you fabricate and install your side panels will depend on the type of structure you have in the cockpit. If the cockpit sides are smooth surfaces (fiberglass or wood ordinarily), you can attach the padding and cover-fabric directly to the airplane. On the other hand, if the cockpit interior is of tubular or sheet metal construction, it might be more practical to prefabricate the panels separately and then install them in the airplane. Either method will yield good results, especially if you take care to avoid having raw cut edges that show. Raw edges never look good and eventually these fabric or Naugahyde edges will tend to separate and curl up. Aircraft parked in the sun for prolonged periods of time are especially vulnerable. The best looking upholstered wall panels are those that have no visible means of support. That is, screws or nails, if used to help secure the panels, are not conspicuously visible. If they have to be visible, try using the decorative hardware specifically intended for the purpose. A panel that is fabricated in place is usually secured to the cockpit sides with adhesives and/or invisible nailing strips. PLIOBOND is good adhesive to use for this purpose. See Figure 3 for some ideas and how this is usually accomplished. Removable panels, ordinarily, are much easier to make because you don't have to work in a crowded cockpit. These panels are built up on a thin metal back, using 2024 T3 aluminum sheet about .016" thick for the purpose. Overlay this metal backing with a 1/2" sheet of polyfoam stuck down with dabs of PLIOBOND. This foam also serves as a sound barrier and gives some body to the paneling. Next cover the padding with your prepared (oversized) cover fabric folding the excess over the edges and gluing it to the backside of the metal panel. Some manufacturers and upholsterers form their removable side panels over a waterproof corrugated polyethylene board. NOTE: Just recently, I found that the realtors around here are putting up For Sale signs made of a lightweight waterproof corrugated plastic board that looks like the same material. I guess that means that more and more sign companies will be using this material and could be a good source for builders. Incidentally, I put a match to a small piece and it seemed to be fairly reluctant to burn. Anyway, it didn't flare up and blaze furiously. In order to obtain a good fitting panel without wasting expensive fabric and materials, you should make an accurate paper or cardboard pattern. Furthermore, you should always use a thin foam padding under the cover fabric (see Figure 2 and Figure 3) to obtain a nicely shaped appearance. Believe me, fabric or Naugahyde glued directly to a hard surface without foam padding will result in a skimpy unattractive installation.
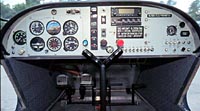
Save Weight . . . Eliminate Side PanelsBuilders of foam and fiberglass aircraft as well as those constructing certain types of all-wood aircraft, may be more fortunate than the rest of us who are building traditional designs. Composite aircraft and wood designs usually have smooth sided cockpit walls. Such cockpit interiors can be attractively finished without the addition of much extra cost or extra weight. Two very important considerations. Check around and you will find that most Vari-Eze, Long-EZ, Dragonfly and Quickie interiors are finished with paint rather than upholstered side panels. The paint being used, and one I highly recommend for the purpose, is called ZOLATONE (Aircraft Spruce and Speciality lists it as ZOLATONE COCKPIT PAINT). You have a choice of three colors, each of which imparts a very attractive finish that has somewhat of a textured appearance. Be sure, however, that your surfaces are smoothly finished because no paint, not even ZOLATONE, will hide surface imperfections. Invisible NailingYou may sometimes find it necessary to nail through the fabric and the panel backing to secure the fabric or trim to the aircraft. If so, use small aircraft nails and drive them lightly. Then, spread the fabric threads with a needle, or an awl, and finish setting the nail head in below the weave with a nail set. Rearrange the threads with your needle point and the nail will become invisible. This little trick is particularly useful when paneling and trimming a wood aircraft. Unfortunately, builders of metal aircraft have to rely more on adhesives, hand stitching and the use of fasteners. GlareshieldsIf you neglected to provide a generous overhang for the windshield coaming (Figure 1) (deck) above your instrument panel, you can still achieve essentially the same result by making and installing a removable glareshield (see Figure 2).
A well-padded glareshield is, in my estimation, an extremely important safety feature. It is surprising how many beautifully appointed amateur-built aircraft have a relatively sharp edge above the instrument panel. The area just below the windshield is sometimes overlaid with a piece of Naugahyde. Sometimes it is simply painted. This practice seems to be more prevalent among builders of all-metal aircraft and biplanes than any other type. If your instrument panel lacks a well-padded head bumper, you can still retrofit your airplane with something like the "add-on" glareshield illustrated in Figure 2. Seat UpholsteryYou may be an exception among builders and have access to a sewing machine that can handle heavy fabrics and vinyls. If so, and you have the inclination and ability to operate that device, you may want to try your hand at making your own seat upholstery, or at least sewing in your own panel welting. About all the information I can offer you regarding the use of a sewing machine used on upholstery material is this . . . open the machine to make as large a stitch as possible. Then either sew through waxed paper or spray silicone on the fabric along the line to be sewn to help lubricate the needle. That's it. Good luck, amigo. You other gents, myself included, will probably have to get by with a little hand stitching with a curved needle, or simply taking your problems and needs to an upholstery shop. Try to select a shop that has experience with aircraft, auto or boat seats since they are more likely to have the experience you want than would a furniture upholstery shop. When you take your seats to have them upholstered, I would suggest that you take along a picture showing the type of seat design you want. Ordinarily, no amount of talking on your part will convey the correct image to the upholsterer. Without a picture to follow as a guide, I can almost guarantee that there will be a misunderstanding between the two of you. A fully upholstered seat is not light. For example, a good metal seat frame complete with upholstery and a folding back will weigh between 12 and 16 pounds on the average . . . assuming, of course, that the seat is efficiently designed. Incidentally, anyone contemplating the installation of a seat from a foreign car had better be prepared to haul around a seat that weighs about twice as much as a standard aircraft seat. The seats in the photo are from a Toyota. They are beautifully upholstered and feature adjustable backs. They are also very comfortable . . . but they do weigh about 25 pounds each. Maybe they could have been lightened a bit, but little or no effort was made to do so. Obviously, such seats in a small low powered aircraft like the KR-2 would be out of the question. If you were to use a seat salvaged from a production aircraft, such as a Cessna 150 or a Piper Cherokee, you might not have to do a thing to its upholstery. In that case, all you will need is some matching or complementary fabric for your side panels, provided you intend to go that far. On the other hand, if the salvage seat fabric is in bad condition, you can purchase a seat upholstery replacement set for it from an outfit like Airtex Products, Inc., or perhaps elsewhere, for about one half the cost of having a custom job done at an upholstery shop. Generally speaking, you can assume that the higher quality fabrics are more likely to have better fire resistant qualities. Assuming this to be so, you may find that even with their higher initial costs they will turn out to be fairly competitive with the cheaper fabrics, especially when you consider the added cost of a fire resistant treatment. Fabric SelectionWithout a doubt, you will spot Herculon in the first stack of fabrics you look at because it is inexpensive, feels and looks good. Unfortunately, for aircraft installations it is a poor choice. It is not a durable fabric when continuously exposed to the sun. In short, it is prone to sun rot. Your most durable and flame resistant fabrics seem to be nylon, which is priced about $50 per yard, and wool, running over $40 per yard. It is no wonder that the more attractively priced Herculons are selected by more amateur builders regardless of the fabric's inadequacies. Other considerations in addition to price often influence your choice of upholstery materials. Take leather. It is a fine natural material that has a lot of eye appeal to say nothing of that ever present smell of luxury . . . genuine leather. Its major shortcoming, however, is that in areas of high humidity, it mildews and rots, and is difficult to maintain because of that. Of course, hides are expensive and come in animal shapes and not in convenient widths and sizes. That means more than one hide may be necessary to get the larger pieces needed. Naugahyde is a synthetic substitute to leather and is immune to the deficiencies of leather. Besides, it is much less expensive. It is, however, a fairly heavy material, and is best used for small areas as trim. Do not stretch Naugahyde severely when attaching it with adhesives as it will eventually pull away. The better grades have a fabric backing which will help make installation easier. The best selection for seat upholstery is a light-colored woven breathable fabric. Although light colors fade as much as dark colors, the degree of fading is not as noticeable. Woven fabrics are far better for seats than solid vinyls (plastics) because the fabrics will never feel as hot or cold to the touch. In the summer, the plastic seats will scorch your fanny or any part of you that touches them while the fabric covered seats will only exude a gentle warmth. The more you think about paneling, carpeting and upholstering for your airplane, the more you realize that what you finally elect to do will be influenced by two important considerations, pounds and pesos . . . parasitic pounds and parted pesos, that is. |
|
|
|
|
Members Home | EAA Flight Planner | e-HOT LINE | Aviation Advisors | Magazine Search | Aircraft Facts
|
|
|
|
|
|
EAA Aviation Center |
www.eaa.org |
|
All content,
logos, pictures, and videos are the property of EAA |
|