Homebuilt Aircraft Interiors, Part 1 - Basic Cockpit Accommodations
Sport Aviation - 01/85
By Tony Bingelis
WITH
ALL THE new homebuilt, ultralight and lightplane (ARV) designs crowding
into the homebuilt scene I sometimes wonder if there aren't more
aircraft designers than there are builders. Among the current crop of
favorite homebuilts are some very nice designs. So nice that I wish I
could start building 3 or 4 of them at one time. But, I assure you, one
homebuilt project at a time is plenty for anyone.
All
of those nice designs have cockpits but who thinks of cockpit
accommodations when selecting a design to build? It is the aircraft's
overall appearance that we get hooked on initially. Then, predictably,
our interest will switch to the aircraft's touted performance, but
seldom does the matter of cockpit size and interior layout command much
of our attention until sometime later. Of course, there may be an
exception to this process, especially if the airplane design is
exceptionally small, or if there just happens to be a prototype before
us that we are invited to climb into and try on for size.
At
any rate, no matter what selection process you follow in picking a
project, don't get completely taken in by the beauty of a particular
design without first determining other essentials, like the cockpit's
ability to accommodate you comfortably, for example.
A
good roomy cockpit should be rated on a par with good looks and good
aerodynamic performance. If the cockpit compartment is cramped or
poorly designed, you will become disenchanted with your pride and joy
soon after it is completed. Avoid that dismal prospect by giving early
attention to the cockpit features that are really important to you. If
you are already building and have never sat in, or flown, a copy of the
design, you might well be wondering how well your cockpit will fit your
requirements.
The Cockpit Area In General
I
guess most any builder expects a few surprises to crop up during the
construction of his project. But one surprise that nobody expects or
wants is to learn that his cockpit is too small for him, that it is
difficult to get into and that there is insufficient legroom. Perhaps
it is also too narrow for his broad shoulders.
Insufficient
headroom can become a major irritant, too. But of course there is a
penalty to pay for generous headroom and shoulder width accommodations
in any cockpit and that is profile drag. You should, therefore, expect
that cockpit space will ordinarily be at a minimum consistent with
"average" comfort needs because profile drag is usually reduced with a
reduction in profile area. Crowded or not, all of your cockpit housing
and control functions will have to be made to fit into the confines of
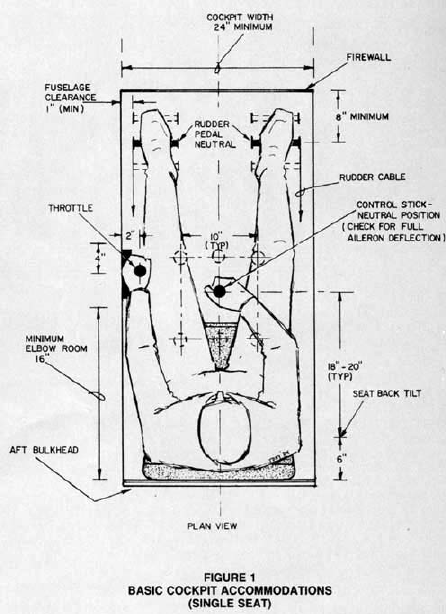
the compartment area set aside for the cockpit or cabin (Figure 1).
Seating Accommodations
Before
you undertake to install any of the miscellaneous support systems and
equipment, you must decide where to install the seat or seats. The seat
must be positioned and installed to assure your comfort and efficiency
during the operation of your airplane. This means that you will have to
determine the proper horizontal and vertical position best suited to
your own physical configuration.
A
cockpit designed or built especially for your own use need not have an
adjustable seat. That would only involve a lot of unnecessary work and
extra weight. Just make sure that you position the seat where you want
it before you build it into the structure.
If
you intend to allow other pilots to fly your airplane, or if you are
building a two-seater, adjustable seats and/or rudder pedals could be
worth installing. Any adjustable seat should be of a simple design and
must be constructed and proof tested to your satisfaction before
installing it in the aircraft. But remember this . . . if is far easier
to make the rudder pedals adjustable than it is to engineer and build a
sliding seat installation. Besides, a runaway seat on take-off could be
disastrous. That sort of thing does happen, you know.
The
structural design of the fuselage exerts a big influence over what you
can or cannot do in locating the seat. Often it must be bolted directly
to the cockpit floor (no legs) in order to obtain the minimum headroom
you can get by with.
In most
designs other than the low wing type, the horizontal location of the
seat can be changed to a limited extent. The reason you cannot alter
the seat location in many low wing aircraft is because the front spar,
typically, cuts across the fuselage in the cockpit area. In small
aircraft this absolutely restricts the seat location. The usual
practice, in the past, has been to plunk a plywood slab down over the
spars to serve as a (butt numbing) seat. I'm happy to say that most
homebuilders have progressed beyond this primitive solution, or at
least they aspire to install something more comfortable. Present
practice is to install a dished out base for the seat bottom in the
space between the two spars. As I recall, Mr. Pazmany, designer of the
PL-1, PL-2 and the popular PL-4, was one of the early leaders in using
this technique for installing seats in all his designs.
An
immovable seat leaves you with one alternative for making legroom
adjustments - adjustable rudder pedals. That is you will have to modify
your rudder pedal connections so that they can be adjusted to position
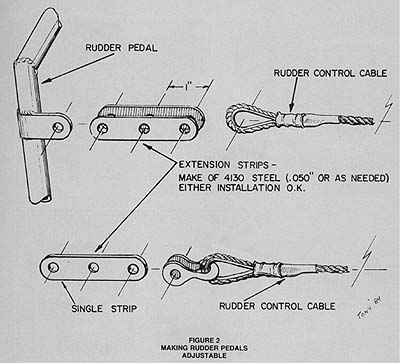
the pedal further forward or further back (see Figure 2). This will help obtain the proper leg angles for both short and tall pilots.
The
seat back is another important part of the seating accommodation. Its
angle of tilt or slope can, in effect, affect the amount of headroom
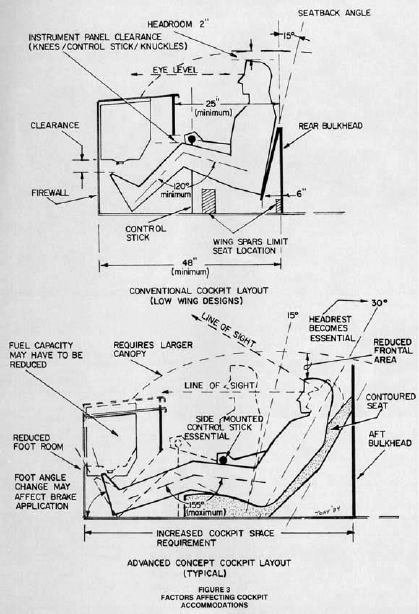
and the degree of comfort or discomfort the pilot will have (see Figure 3).
Unfortunately, its location, as well as its slope angle, will be
limited by the structural bulkhead directly behind the seat. This
bulkhead is most often positioned perpendicular to the thrust line or
top longeron. In order to increase the seat back tilt angle, the bottom
portion of the seat back has to be moved forward several inches. This,
of course, will use up at least 6 inches of potential legroom. Some
aircraft designs can easily give up that amount of space (mostly
biplanes) while others simply cannot.
Entry and Egress Considerations
Now,
how about getting in and out? Will your knees fit under the instrument
panel? They bend only in one direction you know. If you're lucky, you
probably have already had the opportunity of getting into and out of
the prototype and are familiar with any shortcomings the cockpit design
might have in this regard. If so, you can better anticipate the type of
adjustments you may have to make, if any. For example, the bottom of
the instrument panel might have to be raised slightly or the panel
moved forward (away from you) to correct an entry difficulty unique to
your needs.
If you have to
move the instrument panel back to make room for gyro instruments
between a front fuel tank and the instrument panel, be careful that you
do not make it more difficult to get into and out of the cockpit.
Anyone
building a two-seater should also think about his passenger's needs.
Passengers are not, ordinarily, familiar with structural limitations
and could damage your airplane or themselves if provision is not
provided for a dignified entry and exit. A built-in handhold is a
valuable aid and one that can be fitted easily to most any windshield
bow. The provision for ease of entry or exit under normal and emergency
conditions should not be compromised. I don't think that is asking too
much, do you?
Control Stick Dilemma?
After
you have resolved the seat location problem, you should turn your
attention to finding the best position for the control stick. I'm sure
that if you are building from plans, the control column mounting
mechanism location is already established and you are "stuck" with that
particular installation. Most of the time the location will be just
about right. Sometimes, however, it may place the control stick in an
awkward position, too far forward or aft for comfort. Of course, slight
changes in the stick's neutral position can be made by lengthening or
shortening the control cables (or elevator push-pull tube). However,
this causes the control column to be slanted and may convey a false
"neutral" sensation through your hand. A better way to make larger
changes in the positioning of the control stick's neutral position is
by making and installing a curved control column. A curved control
stick will often eliminate or at lease minimize this kind of problem.
It may also eliminate the problem of your knees or legs getting in the
way and interfering when applying full aileron.
It
is well to remember that a short control stick will increase control
sensitivity and a long one will reduce it. However, don't make your
control column so long that it just barely clears the bottom of your
instrument panel because your knuckles won't.
Rudder Pedal Placement
Try locating the rudder pedals so that they permit your knees to be slightly bent (see Figure 3)
so as to form an approximate 120° angle (no more than 155°) between
your upper and lower legs. This will help you obtain full rudder travel
and will establish a comfortable position for your legs. At the same
time it will also give you the best foot angle for easy brake
application.
The so-called
"standard dimensions" for the spacing between rudder pedals is often
impractical to achieve in most homebuilts. For example, in a single
seat installation the rudder pedal location to either side of the
centerline of the fuselage is determined more by where the control
cables are attached than by anything else. If the rudder cables are
routed along the fuselage sides, the rudder pedals cable attachment
points will, naturally, be close to the fuselage sides. This may
require the rudder pedals to be spaced quite far apart in a wide
cockpit or quite close together in a narrow cockpit. In an installation
where the cables are routed through the center of the cockpit, the
pedals will probably have to be positioned closer together, either side
of the centerline. Neither condition, however, should create an
uncomfortable situation for you.
One
feature that could create a poor cockpit condition is a wide center
console. So will an extension of the instrument panel all the way to
the cockpit floor. This is so because you will have to straddle the
thing when you get in the airplane. Furthermore, you will be forced to
keep your knees apart during the entire flight. The inability to move
your legs around because of this hindrance may create a most
uncomfortable condition. In addition, you may no longer be able to
clamp the control column between your knees (poor boy wing leveler)
while handling your navigation charts on flights into strange territory.
While
on the subject of legs and knees, be sure that there are rounded smooth
surfaces against which your knees may be rested. Sharp corners and
unyielding structures can be torturous on a cross-country flight.
Incidentally, a center console is not ordinarily a problem in a
side-by-side two-seater.
Engine Controls
Should
you mount the throttle quadrant on the left side, military style, don't
make the mistake of locating it too high or too far aft in the cockpit.
If you do, you may find that you won't be able to pull the throttle all
the way back because your elbow hits the seat back or aft bulkhead. A
throttle positioned too high is tiresome if you, like many a pilot,
prefer to keep your hand on it most of the time.
Visual and Visibility Factors
Before
making that final installation for the instrument panel take a critical
look at it. Is it too close to view comfortably? Your eyes can see more
of it if the panel is not too close.
Are
there sufficient areas of windshield and windows to see through? Areas
free of large frames and braces that might be cluttering your field of
vision? Of course, nothing can be done about moving the wings out of
your line of sight, but in the early cockpit layout stages other
potential hindrances can be minimized.
For
your own safety, good visibility from the cockpit should never be
sacrificed for the sake of esthetics. Super-sloped windshields, even if
distortion-free, aren't always as practical or as aerodynamically
effective as they may appear (see Figure 3).
Seat Belts and Shoulder Harnesses
Plenty
has been written about seat belts and shoulder harnesses and I will
only say here that they are extremely important, should be installed
and must be anchored to solid structure . . . not the seat.
Believe
me, there is a tremendous amount of difference in the safety, size and
arrangement of cockpits among the many designs being offered to
potential builders so, if you can possibly arrange it, fly it or at
least try it on for size before you start to build it.