AIRCRAFT CONSTRUCTION
An Article Series
by Ron Alexander
PAINTING... Solving the Mystery
By Ron Alexander
Ask a group of airplane builders whether or not you should paint your own airplane and then stand back and listen. The opinions will equal the number of people present. The painting issue is very important since the final finish of our aircraft is most of what others see. When someone inspects your airplane they will also judge the quality of construction by the final finish. The painting needs to be done properly. If you have no painting experience you will usually view this as a formidable task. It is very tempting to dig out the yellow pages and begin looking for a professional painter. Professional painters usually have one goal in mind—provide a quality paint job as quickly as possible and then move on to the next job. Professional painters are often not familiar with the type of paints used in the sport aviation industry. This is particularly true with fabric covering topcoats. Painters are professionals so they are expensive. The cost of painting an airplane varies from one location to another but it is not unusual to be charged $3,000-$4,000 or more for a quality paint job. Professional painters have the advantage of a properly equipped facility along with top of the line painting tools. They also should be experienced with the preparation procedure and the painting process. It is very tempting to fly your airplane in and leave it with a pro. It is also noteworthy that hiring someone to paint your airplane does not affect the major portion rule of custom building. It is perfectly acceptable to contract the painting.
You can complete a professional paint job on your custom built airplane even if you have no experience. Painting equipment and the paints used today make it much easier for an individual to paint their own aircraft. After all, you have spent years building this masterpiece so why would you want to hire out the painting? The custom airplane builder will spend more time and expend more effort in the painting process than will a professional. It’s your airplane! You have built it from the beginning with attention to every small detail. You want the same attention on the final finish. Sure you don’t have a bug free working environment like a professional shop and you may not have the experience of a pro but all custom builders possess two major advantages, the desire for perfection and the quality of perseverance. With those two characteristics you are capable of a professional looking paint job. Basically, all you need is proper equipment, time, the ability to follow directions, and practice. Even if you have never picked up a spray gun you can do the job.
| A charcoal filtered respirator. | 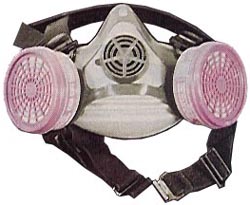 |
Now that I have persuaded you to paint your own airplane where do you begin? You will need some sort of paint facility, good painting equipment, and the knowledge necessary to prepare and paint the airplane. I will discuss all of these in this and the next article. I will discuss what type of facility is needed, spraying equipment, how to prepare surfaces for paint, and the actual process of painting.
When should you paint your airplane—assembled or prior to assembly? A first time painter will be better served to paint the airplane prior to assembly. It is much simpler to paint the individual parts of an airplane rather than to paint the entire airplane at one time. However, most of our airplanes are smaller in size so painting the completed airplane is not as difficult as painting a large assembled aircraft. In either case there are ways to accomplish a quality finish that will be discussed later. Some builders will want to wait until they have test flown the airplane prior to painting. That enables them to correct problems and make necessary changes resulting from the test flying period. Some of these changes could affect the finish of the aircraft so they will wait until this time for final painting. Again, if you possibly can, paint the airplane prior to assembly. Painting an airplane is literally 90% preparation and 10% painting. Be ready to spend most of your time preparing surfaces for painting. The actual spraying process consumes a small amount of time. Remember also to practice-practice-practice. Before you begin applying the topcoats you will have acquired experience spraying primers. Obviously, the primer coat does not show so if spraying mistakes are made they can be easily corrected. You can also practice spraying techniques on large pieces of cardboard, old doors, masonite, stove pipe, etc.. If you are painting a fabric covered airplane you will have literally hours of practice spraying the more viscous coats of chemicals used on fabric. Then when you are ready to spray the final color coats you can do so with confidence. The bottom line is this—painting an airplane is usually approached with much more fear than is necessary. Whether or not you elect to paint your entire airplane you certainly will end up painting a number of small parts. Consider painting the airplane yourself. You can do it!
FACILITIES FOR PAINTING
Ideally you would have a clean, well lit, temperature controlled paint shop. Realistically, you will probably have to paint in your garage. Some builders are fortunate enough to locate a hangar or other such facility for their painting. Bear in mind that some airports will no longer allow painting unless the shop is designed and built to comply with local restrictions. Certain locations require the user of solvent based paints to filter overspray and have a method of collecting waste. If you are using a water based paint you will not be faced with this problem.
You do not want to use your basement for painting. The fumes will permeate the entire house and you will not be popular with your family. A garage or workshop is adequate. After you have found a suitable location for painting the next step is to build a poor man’s paint booth. This can be done very easily by using PVC pipe and plastic sheets. Build a square frame out of wood or PVC pipe large enough to cover your airplane or the largest surface you will be spraying. You should allow enough space to be able to walk around the surface. You can hang the frame from your ceiling with pulleys so you can raise and lower it. Cover the roof and sides with plastic sheeting stapled or taped to the frame. Tape the sheets together using duct tape. At one end of the booth place a furnace filter and at the other end an exhaust fan. This will provide filtered air. Make sure the fan has an enclosed motor with no chance of sparking. If you are unsure about the fan, leave it out and quit spraying when the booth becomes full of overspray. The overspray will settle in minutes and then you can go back to work.
Lighting is of utmost importance. Your booth should have an abundance of lights on moveable light stands or any other way you can arrange them. Shield the bulbs with chicken wire to prevent breaking which could ignite paint particles. When you are painting you cannot have too much light. You will also want to hang small pieces of your airplane for spraying. This can be accomplished by using welding rod hooked over a length of pipe. Then attach the small pieces to the welding rod. The length of pipe or wood can be suspended from the top of the spray booth.
You do not want to paint in the following areas: (1) outside in fog or high humidity, (2) outside in direct sunlight, (3) in the wind, (4) in a dusty place, (5) in a rented or borrowed spray booth where you can’t take your time. You will usually not be able to paint when the temperature is below 60 degrees F. When you have finished painting you can throw away your paint booth or donate it to a friend. It is important that you have a clean, well ventilated, and well-lit area.
 PAINTING EQUIPMENT
Do not try to save money on painting equipment. High quality paint rigs produce high quality finishes. There are four basic methods of applying paints. They are: (1) conventional pressure fed gun, (2) High-Volume, Low-Pressure (HVLP) systems, (3) airless spraying, and (4) electrostatic spraying. Airless spraying and electrostatic spraying are used primarily in production work. Airless sprayers force paint through a small tip opening at extremely high fluid pressures ( usually 1200 to 3600 psi ). Using this amount of pressure affords airless sprayers the ability to spray almost any coating. Because of the high pressures airless sprayers are rarely used in the aircraft industry. Electrostatic spray systems charge the paint at the tip. A high voltage difference is set up between the paint and the object to be painted. The charge attracts the particles of paint and they wrap around the object. This type of spraying is used in factory applications.
Conventional Spray Systems
That leaves the custom aircraft builder with 2 choices of spraying equipment, conventional pressure and HVLP. The conventional system uses a high pressure source, usually an air compressor. The air compressor must be capable of delivering about 40-50 psi at the spray gun. This means the compressor must have adequate storage and be capable of supplying 90 psi+ at the compressor outlet. These high pressures push paint out of the gun and mix it with the airstream. Because the pressures are so high the paint is atomized effectively so that it can be applied to the surface. High pressure guns have been around for years. They can be used with large volume "pressure pots." Pressure pots hold up to 5 gallons of material that is handy when applying doping chemicals used on fabric airplanes. The spray guns used for smaller jobs are usually suction fed. The same high pressure is used to atomize the paints. The coating is held in a quart cup and it is drawn into the airstream by the high pressure airflow creating a vacuum. If you are going to use the pressure-fed gun or the suction gun buy a good brand. Make sure the cup has a means of venting that will allow you to position it horizontally without dripping paint on your surface. The nozzles used with paint guns are as important as the gun itself. Certain nozzles are to be used with specific types of coatings. You will need to purchase the proper nozzle recommended by the manufacturer for the coating you will be spraying. If you choose the conventional spraying method be absolutely sure you have moisture traps and filters on your air compressor. Another point, if you are using a pressure pot you must keep the hoses clean. If they are not properly cleaned particles of old paint will be loosened and sprayed onto your project. A disadvantage of traditional high pressure painting is the high velocity of the paint particles as they reach the surface. Many of the paint particles will actually bounce off the painted surface and gather in the air in the form of a cloud called overspray. Often a large percentage of the paint itself (30-40%) which is used ends up as overspray on the floor or drawn through the filter. At the price of paint that can amount to a lot of money passing through a filter.
High Volume, Low Pressure Systems
Because of the waste and overspray problem, a new technology was introduced—High-volume, Low-pressure (HVLP). The pressure used in these systems to atomize the paint is much lower (3-5psi). The paint cup is pressurized forcing material to the nozzle. As a result, the overspray problem is minimized. Most of the paint actually adheres to the surface being painted instead of bouncing off and collecting elsewhere. To achieve this advantage a HVLP spray gun must be machined to a higher degree than an ordinary spray gun. The HVLP spray gun is designed to gather the air inside the gun and send it downstream with as little pressure drop as possible. This means careful machining must be carried out to reduce turbulence that impedes airflow. In older pressure guns if a passage was too small you simply increased the pressure and solved the problem. That means conventional spray guns do not have to be machined to exact specifications.
Two types of HVLP spray systems are available. One is the turbine system and the other is a conversion spray gun. A conversion spray gun uses regular high pressure air and drops the pressure before it goes into the gun. A conversion gun is simply a HVLP spray gun with a regulator in its handle. This type of system requires a high capacity air compressor with moisture traps. The HVLP type we will discuss is the "turbine system." An air compressor is not used with the HVLP system. Instead, the system is equipped with a turbine not unlike your vacuum cleaner. In fact, years ago Electrolux supplied a sprayer attachment with their vacuum cleaner. Evidently that was the first HVLP system. The turbine need only supply a large volume of air to the gun to work effectively—high pressure is not necessary. All that is needed is an air source that emits about 50 cubic feet per minute of air at less than 10 psi that is sufficient to power the HVLP spray gun. A turbine is a high-speed centrifugal blower motor operating near 20,000 RPM. Because of the high RPM the air is heated due to the friction. This heat serves to eliminate all moisture from the atomizing air. This heating effect also reduces the flash or drying time that helps to minimize blushing. A HVLP system is sold with a turbine, hose, and spray gun. The majority of the cost is found in the spray gun and not the turbine due to the machining requirements of the gun discussed earlier.
HVLP spray guns also are either non-bleeder or bleeder. The term non-bleeder means that when the user releases the trigger of the gun the air flow stops. With a bleeder gun the air flows continuously; the trigger only starts and stops the flow of paint. A bleeder gun will provide a better finish. However, use of a bleeder gun requires care because dirt and other objects can be easily blown onto a painted surface.
Lets look at the advantages of the HVLP system. First of all, the overspray is reduced dramatically. That means a saving in coatings typically of about 30-40%. Secondly, an air compressor is not needed. The units come with a 110 volt turbine that can be used anywhere. Thirdly, the moisture problem is eliminated. One of the most significant problems a painter faces is the presence of moisture that can splatter onto a surface along with the paint. The heating of the turbine introduces heat that eliminates up to 95% of the moisture content. Lastly, HVLP systems enable the beginning painter to achieve a professional looking finish. They are easier to use than conventional spray outfits. Individuals who have experience painting with conventional spray outfits will have to learn the different techniques required to use HVLP systems. HVLP systems expend heavier amounts of material than conventional guns. This, of course, means different techniques. Remote paint pots with capacities of 2.5 gallons are also available with these systems.
| The Axis HVLP paint system. | 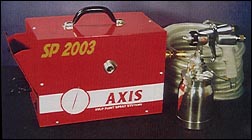 |
To conclude, HVLP paint systems have obvious advantages. Two different brands are shown in the article. The price of these units is usually between $700-$800. That includes the turbine, 30 feet of hose, and the spray gun. You will also want to purchase additional nozzles for the spray gun depending upon the type of paint you are spraying. Many people recommend an additional length of hose that reduces the temperature of the air reaching the spray gun. If you have a conventional system that is high quality then by all means use it. Professional painters have been using conventional systems for years with excellent results.
SAFETY ISSUES
Certain health hazards do exist with spray painting. Of course, the hazards depend entirely upon the chemical that is being sprayed. The most significant health hazard occurs when atomized chemical particles are inhaled. You must protect yourself with an adequate respirator. A charcoal filtered respirator, such as the one pictured, is sufficient for most primers, dopes, and paints. However, if you are using any type of polyurethane paint you should have a forced air breathing system. Polyurethane paints emit polyisocyanides that can be extremely hazardous to certain individuals. Some people have severe reactions to polyurethanes so don’t take a chance. A simple forced air breathing system is pictured and is manufactured by HobbyAir. It is available for less than $400. A good investment to protect your health.
| A forced air breathing system available from HobbyAir. | 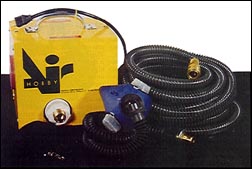 |
You also need to protect your skin. Wear Invisible Gloves barrier cream or latex gloves when mixing or spraying. I would also recommend you purchase a Tyvek spraying suit. They are not very expensive and they will protect both your skin and your clothes. If you do not use one of these suits wear long sleeves and long pants. If you spill solvents on yourself, remove your clothes and wash the area with soap and water and put on fresh clothes. Do not mix paints with an electric drill. The motor could spark and cause a fire. Use eye protection in the form of goggles when mixing and spraying. Keep an eye wash station nearby in case of emergency. You should also have fire extinguishers handy that are rated for petroleum fires. Under certain atmospheric conditions the action of sanding or spraying can generate static electricity. When this static charge is transferred to a surface the resulting spark could ignite solvent vapors. Ground the structures being sanded or sprayed.
Now that we have determined that we can paint our own airplane, we know what facilities are required, and we understand the equipment, our discussion next month will be how to prepare different types of surfaces and followed by a discussion of the actual spray painting process.
By Ron Alexander, © 1998. The author can
be emailed directly at ralexander@sportair.com
This article was first published in EAA Sport Aviation
magazine (January 1998).
The article represents the viewpoints of the author, and not necessarily those of Zenith
Aircraft Company.